HA guide – Part 2 – Server / Domoticz setup
In this second part of the guide, we are going to create a VM and install Ubuntu server, followed by the installation of Domoticz.
Most people are using a Raspberry Pi to run Domoticz on. And to be honest, this works perfectly fine!
Since I have a VMware server running anyway, I decided to use a VM instead…. just because I can.
In this guide, I’ll just cover the creation of the VM, and how to use hardware passthrough to attach other hardware to the VM by USB.
For detailed installation instruction of Domoticz on the platform of your liking, check out the great Wiki!
First step, is to create the VM.
I created a VM using the following specs:
Guest OS: Ubuntu Linux 64-bit
CPU’s: 2
Memory: 2GB
Harddisk: 32GB
 Because I wanted an easy way to add and remove hardware to the Domoticz VM, i decided to use PCI-E Passtrough (VT-d) to give the VM full controll of an PCI-E USB controller.
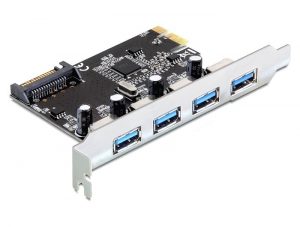
The cheapest option was using the controller displayed here: a Delock 4x USB3.0 PCI-E card.
After I installed the card in my server, I enabled passthrough for the controller.
In the VMware Webinterface go to: Host – Manage – Hardware – PCI Devices.
Now look for the PCI-E device. In my case: VIA VL805 USB 3.0 Host Controller.
Check the checkbox, and click toggle passthrough. Reboot the server, and the device is available for VM passthrough.
Now, open the VM settings page, and choose ‘add other device’ – PCI Device.
The device will appear on the settings make. Just make sure to select the correct one if you have multiple devices available like me.
Now go ahead and install the OS of your choice. I went for Ubuntu 16.04 server.
I did no special configuration during the install, except for selecting OpenSSH server on one off the last steps.
If you forget this, you can always install this later, using the command: sudo apt-get upgrade && sudo apt-get install openssh-server
Now you can ahead and install Domoticz.
Just follow the instructions on the Wiki page.
Don’t forget to install open Z-wave first, before compiling Domoticz. If you plan to use Z-wave that is…
I prefer to use a static IP address for my Domoticz VM.
Login to your Domoticz server, either through the console, or SSH.
edit the interfaces file in /etc/network: sudo nano /etc/network/interfaces
You will see something similar to this:
# The primary network interface
auto ens160
iface ens160 inet dhcp
Change into:
iface ens160 inet static
address 192.168.1.100
netmask 255.255.255.0
network 192.168.1.0
broadcast 192.168.1.255
gateway 192.168.1.1
Of course you’ll need to change the address / subnet / gateway to suit your own network.
Now save the file (cntrl+x, yes) and restart networking: sudo /etc/init.d/network restart
After you have done this, I’ll recommend you to change the default behavior of device learning within Domoticz.
When you connect a gateway like the RFLink gateway, Domoticz will add all devices it ‘sees’. In this case, RFLink’s 433Mhz radio will pick up all devices from your neighbors. I have to admit, you can have a lot of fun with then, and make your neighbors downright crazy with some scripting, in reality a large amount of devices will slow Domoticz down. It also makes searching the right device in your device list a bit of a hassle when you’ve learned 700 devices in your neighborhood. Believe me, I know from experience…
Navigate to Setup – Settings, and deselect ‘Accept new Hardware Devices’.
This means you have to hit the red button below this setting when you do want to learn a new device. It will enable discovery for 5 minutes.
Take a look at some other settings while your in the menu, you can change some metrics, energy costs, setup notifications trough various services like pushover for example, set low battery alarm for sensors, configure e-mail, or create (automatic) backups.
In the next part, I’ll cover adding ‘Kaku’ 433mhz and Milight 2,4Ghz support using an RFLink Gateway. Stay tuned!


Leave a Reply