HA guide – Part 3 – Adding an RFlink gateway and add Milights
In my current setup, i’m using a couple different protocols in the HA system. Some of them require the use of a gateway.
Part 3 of my guide covers the implementation of the RFlink gateway, and expanding the gateway with an NRF24L01 to add support for Milight.
The RFlink gateway is using a Arduino Mega coupled with a custom shield.
More information on this great open-source project can be found on the RFlink website.
For me, the best place to source the parts was at nodo-shop.nl
They’d put together a great kit containing all the bits and pieces to solder up your own gateway.
The keep the cost as low as possible. I ordered the components kit only, and sourced an Arduino Mega from Ebay.
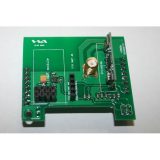
I also sourced the NRF24L01 from Ebay since I was not availible at nodo-shop.nl at that time. You can find it there now as well.
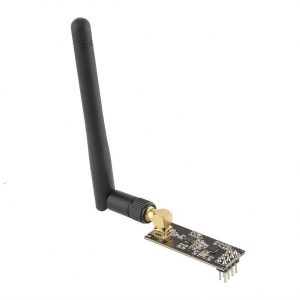 Another option is searching Ebay of a version with an SMA connector like the one pictured.
This way you can attach an external antenna with high DBI rating, expanding the range of the module.Nodo-shop also provides an excellent guide to solder the RFlink gateway. Check it out in the product description.
After soldering the RFlink gateway, and attaching it to the Arduino, you can connect the NRF24L01.
Check the wiring diagram at Rflink.nl (search for Milight) to check howto wire the NRF module up to the Arduino.
Next step is to upload the firmware to the Arduino.
RFlink has made this step very easy. Download the latest firmware from the RFlink website first.
Now connect the Arduino to your PC, and check what COM poort has been selected for the Arduino.
In windows you can do this by hitting the Windows key and type in compmgmt.msc
Now click device manager and expand the Ports (COM & LTP) section and note the COM port used by the Arduino.
You can plug it in and out your PC to make sure you have the right one.
Now open up RFlinkloader.exe and click Select file. Choose RFLink.cpp.hex and select the correct COM port.
Now hit Upload / Program Firmware to Device, and cross your finger, with a bit of magic, some luck and because of the great skills of the RFlink creators, your RFlink is ready to be used.
Next step is to attach the RFlink gateway to your Domoticz server.
Login to your Domoticz server / Pi. And issue the command lsusb
You should a line similar to this: Bus 003 Device 005: ID 2341:0042 Arduino SA Mega 2560 R3 (CDC ACM)
Now run the command dmesg -s 1024 and note the line at the bottom, for me that is: 13031.406689] cdc_acm 3-1.4:1.0: ttyACM0: USB ACM device
Now browse to you Domoticz webGUI, and navigate to Setup – Hardware

Choose Type: RFLink Gateway USB, and give your gateway a name. I chose ‘RFLink Main’ because I might add an other one in the feature to either support more protocols, or to place it somewhere else in my house (to expand the range).
Now choose the noted Serial Port, and click Add.
Adding a switch
The next step, is adding a new 433Mhz switch to your system.
Navigate to Switches, and click Learn Light / Switch.
Now hit the switch you want to add.
If everything is working, you will be presented a new screen where you can name your switch, and choose a switch type.
I’d used the left switch of the AWST-8802 double wall switch, and I’m going to name this ‘Study – SW1’ since the switch is in my study room, and the is the first switch i’m adding.
Choosing a logical naming convention is a smart thing to do, and saves you from a lot of hassle in the future. I always add the name of the room in front of the name, followed by the name of the device.
Adding a Milight
Adding Milights can be a bit challenging at first.
The first thing we need to understand, is how the Milight commands are build, so we can create a scheme to add new lights.
The first command we need to send is the pair command.
The command looks like this: 10;MiLightv1;F500;01;34BC;PAIR;
The important part is F500, you can refer to this as the ‘channel id’, the next 2 digits are 01 in this case. This is the ‘channel ID’.
So if we use this command to pair the Milight, we need the following command to switch it on:
20;17;MiLightv1;ID=F500;SWITCH=01;RGBW=8690;CMD=ON;
You can use any value for F500, I am using F500 for one room, F510 for the next room etc.
You can use 01 – 04 for the channel ID.
Now, lets pair a Milight with this code, and add it to Domoticz.
In the second part of the guide, I recommended disabling continuous device learning.
If you are smart, and followed my advice, we need to start by enabling device learning for 5 minutes.
Navigate to Setup – Settings. Scroll down to Hardware/Devices and hit the big red bottom to enable device learning / discovery for 5 minutes.
Now navigate to Setup – Hardware and click Create RFLink Devices.
Paste in the pairing command. Now we need the Milight to be in pairing mode, this are the first 3 seconds after applying power to the Milight.
So, power on the Milight, and within 3 seconds hit the OK button. The Milight will blink three times, and is now paired!
To add the Milight to the devices in Domoticz, click create RFLink Devices again, and now enter the ON command in the command field.
Hit the OK button. The device should now appear in the devices list.
Navigate to Setup – Devices and behold! There is our Milight!
Now, hit the green arrow on the far right of the line, to add the light to the used devices of Domoticz.
I give it the name ‘Study – Desk Light’
Now navigate to Switches, and click on the edit button of your newly added Milight.
Change the switch type to Dimmer, and click save
You are now able to control the light using domoticz! 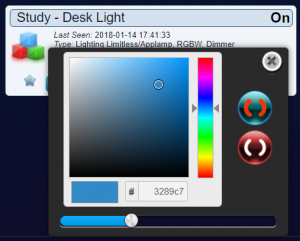
You can turn the light on and off, choose the brightness and select the color. How cool is that!
Now there is 1 more step todo before we are done, we need to group the switch and the light together in a group, so the switch is assigned to control this light.
First, go to Scenes – Add Scene. Choose a name (Study – Desk Light). Choose group as type.
Click OK and click Edit to edit the new group.
Under Activation devices, click add device, and hit the switch you want to use (Study – SW1).
Now under devices, add the Milight, choose a color and brightness level. Click add. Now save the group.
Hit the switch again, and if everything went well, the Milight is now controlled by the switch!
And now you’re probably wondering how you can be so happy just by switching a light on 😀
Stay tuned, in the next step we are adding Xiaomi sensors!




Leave a Reply